In this article, I will demonstrate how to configure eBGP on a Cisco router. I will be demonstrating both IPv4 and IPv6 configuration. This article is targeted towards enterprise network professionals who need to set up eBGP on their enterprise edge routers.
Topology Setup
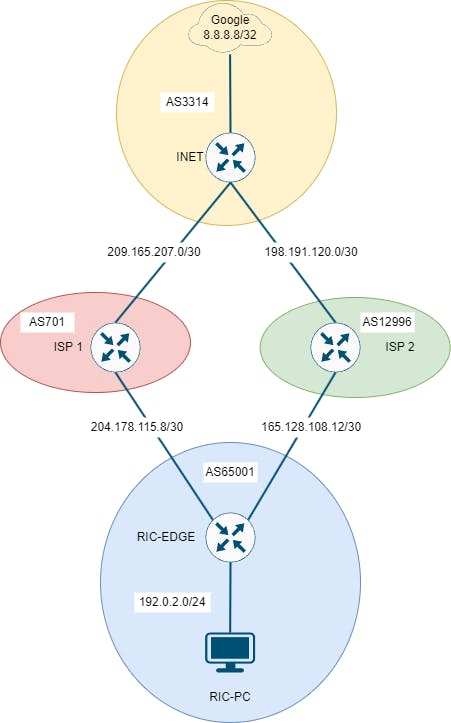
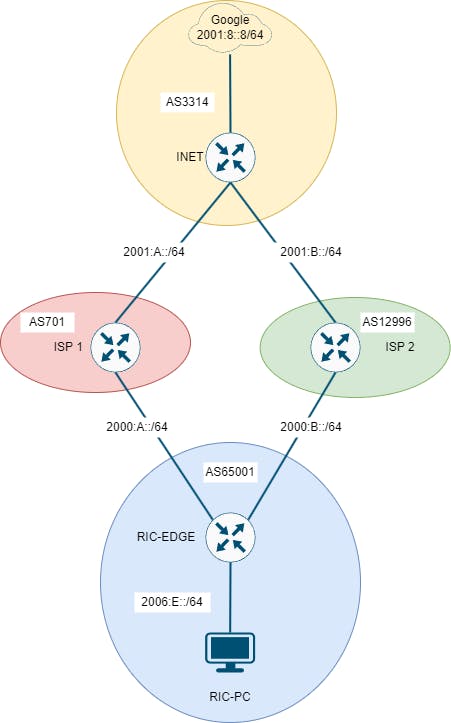
Below are two diagrams representing the sample network topology. The topology simulates a campus edge router with two enterprise-grade carrier internet uplinks. The top diagram shows the IPv4 BGP architecture. The bottom diagram shows the IPv6 architecture. I will be configuring eBGP from the RIC-EDGE router appliance. BGP is already configured on the uplink routers. Please note: this topology does not depict best practice real world configuration. This is an example to demonstrate how to get eBGP up and running in your network. If it is a requirement you implement eBGP in your network, you should run an NGFW appliance behind the network edge to secure your enterprise network from internet traffic.
IPv4 BGP Topology

IPv6 BGP Topology

Configuring BGP for IPv4
Step 1: Start BGP Process
To start, we must define a BGP process with an autonomous system number. In the above topology, our ASN will be 65001. Use the command router bgp [asn] to initiate the BGP process.
RIC-EDGE#conf t
Enter configuration commands, one per line.  End with CNTL/Z.
RIC-EDGE(config)#router bgp 65001
Step 2: Configure BGP router-id
Next, we will configure a BGP router-id. This is not a requirement; however, you should configure one as the router-id is one of the tie-breakers for best path selection for inbound and outbound traffic. Use the bgp router-id [X.X.X.X] command to configure a router-id. I will use 1.1.1.1 as the router-id.
RIC-EDGE(config-router)#bgp router-id 1.1.1.1
Step 3: Define neighbor adjacencies
Next, we will define our BGP neighbors. To configure BGP neighbors, use the neighbor [peer IP address] remote-as [asn] command. I have two internet uplinks in my topology, so I will establish two BGP neighbors, which are:
204.178.115.10 (AS 701)
165.128.108.14 (AS 12996)
As a result, the first command I run will be neighbor 204.178.115.10 remote-as 701 & the second command I run will be neighbor 165.128.108.14 remote-as 12996 as shown below.
RIC-EDGE(config-router)#neighbor 204.178.115.10 remote-as 701
RIC-EDGE(config-router)#neighbor 165.128.108.14 remote-as 12996
RIC-EDGE(config-router)#
Jan 21 15:55:37.001: %BGP-5-ADJCHANGE: neighbor 204.178.115.10 Up
Jan 21 15:55:38.001: %BGP-5-ADJCHANGE: neighbor 165.128.108.14 Up
From the above output, you can see the successful adjacency establishment to the eBGP neighbors following command execution. Let's move on to the next step.
Step 4: Advertise network prefixes
Next, we need to advertise the network prefixes that are inside our autonomous system. In this case, I will be advertising 192.0.2.0/24, to my BGP neighbors. The command to advertise networks is network [x.x.x.x] mask [subnet mask] . Below you will see me advertise 192.0.2.0/24 to my BGP neighbors.
RIC-EDGE(config-router)#network 192.0.2.0 mask 255.255.255.0
At this point, we are done. eBGP is configured and should be running. Let's validate and test this.
Step 5: Validation
To validate succesful eBGP operation, run the show ip bgp command. The show ip bgp command will provide us with the following information:
List of networks advertised by eBGP neighbors.
Details of the path to each network advertised (i.e. the metric, weight, local preference, and AS path length)
Whether or not the route was installed in the RIB or discarded
Below you can see the output from my show ip bgp command. Let's take a look at the output to see if we have any issues.
Jan 21 11:00:09.805: %SYS-5-CONFIG_I: Configured from console by console
RIC-EDGE#show ip bgp
BGP table version is 9, local router ID is 1.1.1.1
Status codes: s suppressed, d damped, h history, * valid, > best, i - internal,
              r RIB-failure, S Stale, m multipath, b backup-path, f RT-Filter,
              x best-external, a additional-path, c RIB-compressed,
              t secondary path,
Origin codes: i - IGP, e - EGP, ? - incomplete
RPKI validation codes: V valid, I invalid, N Not found

     Network          Next Hop            Metric LocPrf Weight Path
 *    8.8.8.8/32       165.128.108.14                         0 12996 3314 i
 *>                    204.178.115.10                         0 701 3314 i
 r>   165.128.108.12/30
                       165.128.108.14           0             0 12996 i
 r                     204.178.115.10                         0 701 3314 12996 i
 *>   192.0.2.0        0.0.0.0                  0         32768 i
 *>   198.191.120.0/30 165.128.108.14           0             0 12996 i
 *                     204.178.115.10                         0 701 3314 i
 r    204.178.115.8/30 165.128.108.14                         0 12996 3314 701 i
 r>                    204.178.115.10           0             0 701 i
 *    209.165.207.0/30 165.128.108.14                         0 12996 3314 i
 *>                    204.178.115.10           0             0 701 i
In the above output, the following information can be digested:
The best path to 8.8.8.8/32 is via next hop 204.178.115.10, the path to the destination is through AS 701 and AS 3314.
The prefix advertisement 165.128.108.12/30 failed to install in the RIB, however the router sees 204.178.115.10 as the best path to get there, the path to the destination is through AS 701, AS 3314, and AS 12996
The best path to 198.191.120.0/30 is via next hop 165.128.108.14, the path to the destination is through AS 12996
The prefix advertisement 204.178.115.8/30 failed to install in the RIB, however, the router sees 204.178.115.10 as the best next hop.
The best path to 209.165.207.0/30 is via next hop 204.178.115.10, the path to the destination is through AS 701.
Let's run a show ip route bgp command to see what BGP routes were injected into the RIB.
RIC-EDGE#show ip route bgp
Codes: L - local, C - connected, S - static, R - RIP, M - mobile, B - BGP
       D - EIGRP, EX - EIGRP external, O - OSPF, IA - OSPF inter area
       N1 - OSPF NSSA external type 1, N2 - OSPF NSSA external type 2
       E1 - OSPF external type 1, E2 - OSPF external type 2
       i - IS-IS, su - IS-IS summary, L1 - IS-IS level-1, L2 - IS-IS level-2
       ia - IS-IS inter area, * - candidate default, U - per-user static route
       o - ODR, P - periodic downloaded static route, H - NHRP, l - LISP
       a - application route
       + - replicated route, % - next hop override, p - overrides from PfR

Gateway of last resort is not set

      8.0.0.0/32 is subnetted, 1 subnets
B        8.8.8.8 [20/0] via 204.178.115.10, 00:15:23
      198.191.120.0/30 is subnetted, 1 subnets
B        198.191.120.0 [20/0] via 165.128.108.14, 00:15:06
      209.165.207.0/30 is subnetted, 1 subnets
B        209.165.207.0 [20/0] via 204.178.115.10, 00:15:23
Notice that, compared to the show ip bgp output, to the show ip route bgp output, we are missing a few entries. Why is this? As you saw previously, a few advertisements failed to get injected into the RIB. Why is this?
Looking back in the show ip bgp output, you will notice an "r" code for some entries, which indicate a RIB failure:
 *>                    204.178.115.10                         0 701 3314 i
 r>   165.128.108.12/30
                       165.128.108.14           0             0 12996 i
 r                     204.178.115.10                         0 701 3314 12996 i
*                     204.178.115.10                         0 701 3314 i
 r    204.178.115.8/30 165.128.108.14                         0 12996 3314 701 i
 r>                    204.178.115.10           0             0 701 i
The reason for which these routes are not being installed in the routing table is because 165.128.108.12/30 and 204.178.115.8/30 are local subnets on our RIC-EDGE router. If we run a show ip route command, we can confirm this:
RIC-EDGE#show ip route
Codes: L - local, C - connected, S - static, R - RIP, M - mobile, B - BGP
       D - EIGRP, EX - EIGRP external, O - OSPF, IA - OSPF inter area
       N1 - OSPF NSSA external type 1, N2 - OSPF NSSA external type 2
       E1 - OSPF external type 1, E2 - OSPF external type 2
       i - IS-IS, su - IS-IS summary, L1 - IS-IS level-1, L2 - IS-IS level-2
       ia - IS-IS inter area, * - candidate default, U - per-user static route
       o - ODR, P - periodic downloaded static route, H - NHRP, l - LISP
       a - application route
       + - replicated route, % - next hop override, p - overrides from PfR

Gateway of last resort is not set

      165.128.0.0/16 is variably subnetted, 2 subnets, 2 masks
C        165.128.108.12/30 is directly connected, GigabitEthernet0/2
L        165.128.108.13/32 is directly connected, GigabitEthernet0/2
      192.0.2.0/24 is variably subnetted, 2 subnets, 2 masks
C        192.0.2.0/24 is directly connected, GigabitEthernet0/0
L        192.0.2.1/32 is directly connected, GigabitEthernet0/0
      198.191.120.0/30 is subnetted, 1 subnets
C        204.178.115.8/30 is directly connected, GigabitEthernet0/1
L        204.178.115.9/32 is directly connected, GigabitEthernet0/1
      209.165.207.0/30 is subnetted, 1 subnets
If any eBGP neighbors advertise prefixes that match the same subnet as any local routes in your RIB, they will fail because there's already locally connected routes to the devices. There is no need to worry about this if you see such an event occur.
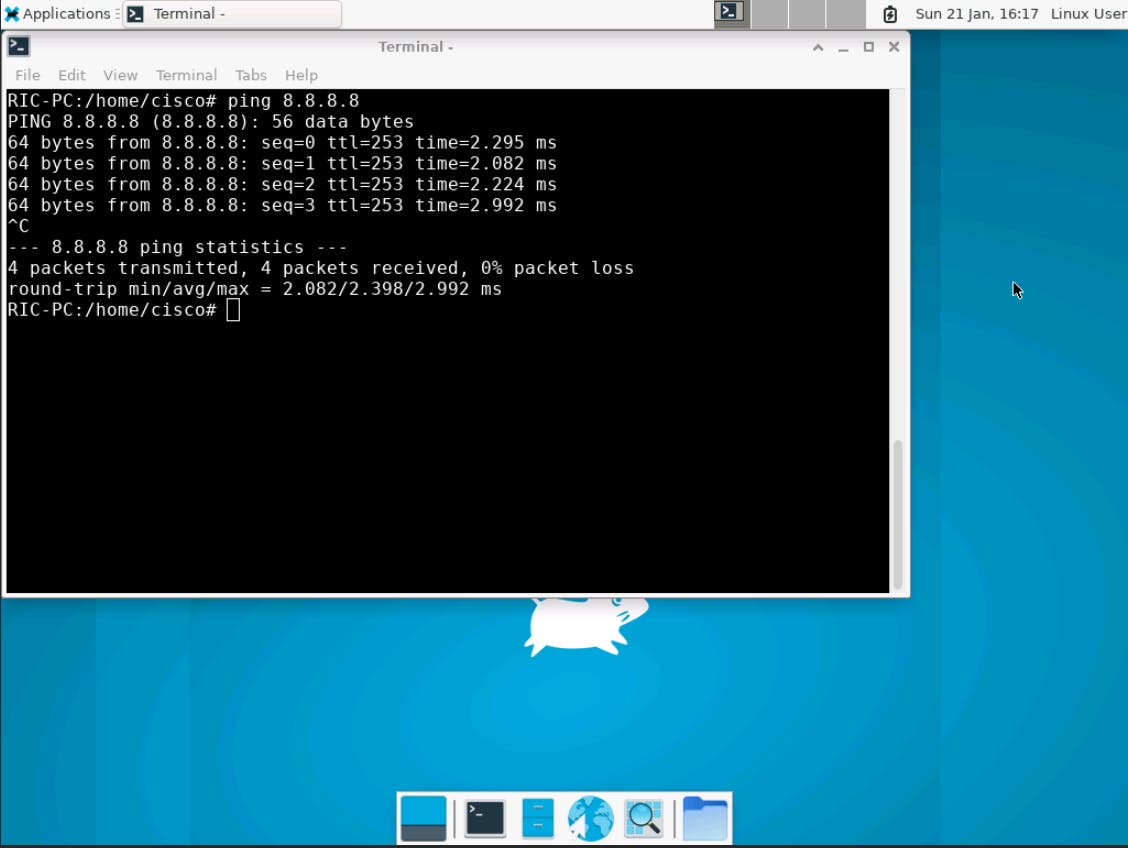
Let's run some ping tests from RIC-PC to confirm access to the internet.

Above, you will see that there is a successful connection to the internet. Pinging 8.8.8.8 replies, confirming that eBGP is operating successfully in the WAN block. I will now move on to demonstrate IPv6 BGP configuration.
Configuring BGP for IPv6
The process of configuring BGP for IPv6 is much different than IPv4. I will walk you through configuring BGP for dual-stack IPv4 and IPv6; both protocols will operate independently from each other. However, if you want to configure BGP for IPv6 only, then skip over the IPv4 steps and just perform the IPv6 steps.
Step 1: Start the BGP process
First, use the router bgp [asn] command to initiate the BGP process.
RIC-EDGE#conf t
Enter configuration commands, one per line.  End with CNTL/Z.
RIC-EDGE(config)#router bgp 65001
Step 2: Configure router-id
Next, assign your router-id with the bgp router-id [x.x.x.x] command.
RIC-EDGE(config-router)#bgp router-id 1.1.1.1
Step 3: Configure neighbor adjacencies
Next, we will configure our neighbor adjacencies. We must define both IPv4 and IPv6 adjacencies. Use the neighbor [x.x.x.x] remote-as [asn] command, and replace [x.x.x.x] with the neighbor's IPv4 address, then run a separate command and replace it with the neighbor's IPv6 address.
RIC-EDGE(config-router)#neighbor 204.178.115.10 remote-as 701
RIC-EDGE(config-router)#neighbor 165.128.108.14 remote-as 12996
RIC-EDGE(config-router)#neighbor 2000:a::2 remote-as 701
RIC-EDGE(config-router)#neighbor 2000:b::2 remote-as 12996
Step 4: Configure IPv4 address family &network prefixes
Now, we must configure the IPv4 address-family in our BGP process. When operating BGP for IPv4/IPv6, the way we advertise networks and operate neighbor adjacencies changes. We use address families to split the configuration, so the router understands how to deal with IPv4 and IPv6 traffic via BGP.
First, use the address-family ipv4 command to change into address-family bgp configuration mode. Then, run the network [x.x.x.x] mask [subnet mask] command, for each network to advertise. In this case, we will advertise 192.0.2.0/24.
RIC-EDGE(config-router)#address-family ipv4
RIC-EDGE(config-router-af)#network 192.0.2.0 mask 255.255.255.0
Step 5: Activate IPv4 neighbor
Next, we have to activate our IPv4 BGP neighbor. Use the command neighbor [x.x.x.x] activate under address family configuration mode to do so.
RIC-EDGE(config-router-af)#neighbor 204.178.115.10 activate
RIC-EDGE(config-router-af)#neighbor 165.128.108.14 activate
Step 6: Configure IPv6 address family &network prefixes
Run the address-family ipv6 command to switch to address-family configuration mode for ipv6. Next, use the network [x:x:/x] command to advertise an ipv6 prefix.
RIC-EDGE(config-router-af)#address-family ipv6
RIC-EDGE(config-router-af)#network 2006:e::/64
Step 7: Activate IPv6 neighbor
Run the command neighbor [x:x:x:x] activate command to activate the ipv6 neighbor under address-family configuration mode.
RIC-EDGE(config-router-af)#neighbor 2000:a::2 activate
RIC-EDGE(config-router-af)#neighbor 2000:b::2 activate
RIC-EDGE(config-router-af)#
Jan 21 11:34:02.539: %BGP-5-ADJCHANGE: neighbor 2000:A::2 Up
RIC-EDGE(config-router-af)#
Jan 21 11:34:06.729: %BGP-5-ADJCHANGE: neighbor 2000:B::2 Up
Above, you can see that our ipv6 neighbor adjacencies are now established. At this point, you have successfully configured BGP for IPv6. Let's validate everything.
Step 8: Validation
To validate successful ipv6 bgp operation, use the show bgp ipv6 unicast command to check if we're receiving advertised IPv6 prefixes.
RIC-EDGE#show bgp ipv6 unicast
BGP table version is 9, local router ID is 1.1.1.1
Status codes: s suppressed, d damped, h history, * valid, > best, i - internal,
              r RIB-failure, S Stale, m multipath, b backup-path, f RT-Filter,
              x best-external, a additional-path, c RIB-compressed,
              t secondary path,
Origin codes: i - IGP, e - EGP, ? - incomplete
RPKI validation codes: V valid, I invalid, N Not found

     Network          Next Hop            Metric LocPrf Weight Path
 r>   2000:A::/64      2000:A::2                0             0 701 i
 r>   2000:B::/64      2000:B::2                0             0 12996 i
 *    2001:A::/64      2000:B::2                              0 12996 3314 i
 *>                    2000:A::2                0             0 701 i
 *    2001:B::/64      2000:A::2                              0 701 3314 i
 *>                    2000:B::2                0             0 12996 i
 *    2001:8::/64
                       2000:A::2                              0 701 3314 i
 *>                    2000:B::2                              0 12996 3314 i
 *>   2006:E::/64      ::                       0         32768 i
Above, we can see successful reception of advertised Ipv6 prefixes from our uplink neighbors.
Let's do a ping test from RIC-PC to verify successful internet reachability.
RIC-PC:~$ ping 2001:8::8
PING 2001:8::8 (2001:8::8): 56 data bytes
64 bytes from 2001:8::8: seq=0 ttl=62 time=2.319 ms
64 bytes from 2001:8::8: seq=1 ttl=62 time=2.109 ms
64 bytes from 2001:8::8: seq=2 ttl=62 time=2.150 ms
64 bytes from 2001:8::8: seq=3 ttl=62 time=2.134 ms
64 bytes from 2001:8::8: seq=4 ttl=62 time=2.000 ms
64 bytes from 2001:8::8: seq=5 ttl=62 time=6.008 ms
^C
--- 2001:8::8 ping statistics ---
6 packets transmitted, 6 packets received, 0% packet loss
round-trip min/avg/max = 2.000/2.786/6.008 ms
We have now confirmed BGP for IPv6 is working.
Conclusion
This article gave a basic demonstration on configuring eBGP for IPv4 and IPv6 on an enterprise edge router. The goal of the demonstration is to give a basic working concept of eBGP. This does not depict how to implement eBGP in the real world. There are some further adjustments we can make, which should be made, to eBGP operate more smoothly in your enterprise edge. I will be creating a future article covering this topic.
Thanks for reading this article. I hope you found this article helpful and entertaining. Feel free to leave feedback in the comments. Stick around for part 2 of the spanning-tree protocol series.

